• When posting, please be aware that artistic nudity is still nudity and not allowed under RpNation rules. Please edit your pictures accordingly!

    Remember to credit artists when using work not your own.

Tutorial unofficial bbcode tutorials

dwale

drownin
unofficial bbcode tutorials
b
* sponsored by dwale's hatred of coding elitists *
So! I've found finding help in regards to coding on this website incredibly difficult and have since decided that I will attempt to ease other's struggles by sharing the knowledge I have acquired through trial and error. I like to think I'm pretty good at coding and have a width-girth of knowledge to dish out. I can do anything from simple tasks (such as placing divs side-by-side) to far more complicated ones (such as tab customization). There is nothing that I will not share with anybody who asks (information wise, don't ask for my codes) and I'm incredibly excited about starting this up. I should probably state that this is in no way sponsored or 'official' information on this site and this is my way of doing things. Likely not the best, but it'll get shit done. Also, this code likely won't stay and I'll update it, but I'm lazy rn.

Anyway, onto how you can request a tutorial. Keep in mind that these will take quite a bit of time, but I will complete them when I have the time. I'll also likely create base codes that individuals can build off of and such.

request form
coding used: i.e. tabs, divs, borders, etc.
brief explanation: explain what you wish to learn from this tutorial/the task you're trying to figure out. i'll let you know if i'm capable or not.
examples: if you have any examples of the coding you wish to learn about, feel free to add them here. however, don't show me codes from other's on this site. i don't need people coming at me.

tutorial nav
tba

scheduled tutorials
tba
 
hello love! i have been learning different ways of the new customized tabs and i was wondering if you can show as a tutorial on the recent tab code that you've done? it's gorgeous!

i have tried seeing Lyro's code as well and have been messing with it, but i saw this thread up as well and i was wondering if you can help and teach us!
i'd love to! it may take a few days but i'll get to it~
 
* disclaimer: tutorial for a coder that's familiar with divs & how they work *
[ Tutorial #1 ]
[ details: ]
☀ learn basics of the position element
☀ create the 'T' effect in this post
☀ requested by HufflepuffOwl HufflepuffOwl
[ coding used: ]
☀ divs (will need basic knowledge of these)
☀ border-radius
☀ position
☀ background-image
☀ left & top
☀ padding
[ step 1 ]
create the outermost div of your code, which will likely determine the width, height, background-color, border, etc. ofc, no specifics are needed for this. it's simply whatever you'd like. when finished customizing, be sure to add position: relative; to the start of your post. without this, the effect you're trying to have will not work and could mess up your page.
c0174996ccf9c45566c0d8578af22fdb.png
Code:
[div=width: 32%;
height: 400px;
margin: auto;
background-color: #F1F1F1;
position: relative;]blah[/div]
[ step 2 ]
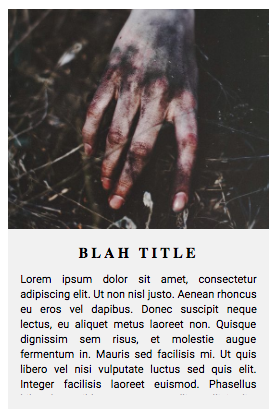
add to the code whatever you'd like, keeping in mind where you want the effect to be placed and leaving enough room to place it there when the time comes. this is, once again completely all up to the coder.
ac2472416a88f6c07b8db6691a394e87.png
Code:
[div=width: 32%;
height: 400px;
margin: auto;
background-color: #F1F1F1;
position: relative;][div=background-image: url(https://s-media-cache-ak0.pinimg.com/564x/26/f9/2b/26f92b94796c824cf37025d39f499ba5.jpg);
font-size: 0px;
width: 100%;
height: 220px;
background-size: cover;
background-position: bottom;]b[/div][div=text-align: center; 
margin-top: 15px; 
text-transform: uppercase; 
color: #000; 
font-family: Old Standard TT; 
font-weight: bold; 
letter-spacing: 3px;]blah title[/div][div=width: 91%; 
margin: auto; 
margin-top: 5px; 
padding: 3px; 
height: 120px; 
font-size: 11px; 
color: #000; 
overflow: scroll;
text-align: justify;]Lorem ipsum dolor sit amet, consectetur adipiscing elit. Ut non nisl justo. Aenean rhoncus eu eros vel dapibus. Donec suscipit neque lectus, eu aliquet metus laoreet non. Quisque dignissim sem risus, et molestie augue fermentum in. Mauris sed facilisis mi. Ut quis libero vel nisi vulputate luctus sed quis elit. Integer facilisis laoreet euismod. Phasellus bibendum nibh egestas convallis sollicitudin. Integer eleifend urna sem, fermentum bibendum eros lacinia eu. Proin a nunc arcu. Praesent nec mi a sapien rhoncus aliquam at in magna. In id facilisis sem, eget faucibus nulla. Sed volutpat nisi sed scelerisque varius. Praesent in orci vel sapien scelerisque pulvinar. Nunc condimentum, elit et interdum commodo, nisi tellus condimentum lectus, ac aliquam orci quam quis odio. Aliquam eu lacinia diam, quis aliquet leo.[/div][/div]
[ step 3 ]
now that the shell of your coding is create, it's time to make the actual circular shape with the letter itself. for this part, we'll be using border-radius, which rounds out the edges of square coding. choose a background color, a height and width (that are the same. i.e. 30px & 30px, 120px & 120px.) that you'd like for the icon to be, and then split that number in half and add the border-radius (i.e. border-radius: 15px; or border-radius: 60px; (#'s correspond w/ last i.e.)). customize the text and enter the letter/number you'd like to be within the circle (be sure to align the text to the center). you can use the 'padding' element to make the space around the letter equal, which i did in my code. don't worry about the positioning of the icon for the moment.
9f3dc753082aba264877e80d3f2f8fe4.png
Code:
[div=width: 32%;
height: 400px;
margin: auto;
background-color: #F1F1F1;
position: relative;][div=background-image: url(https://s-media-cache-ak0.pinimg.com/564x/26/f9/2b/26f92b94796c824cf37025d39f499ba5.jpg);
font-size: 0px;
width: 100%;
height: 220px;
background-size: cover;
background-position: bottom;]b[/div][div=text-align: center; 
margin-top: 15px; 
text-transform: uppercase; 
color: #000; 
font-family: Old Standard TT; 
font-weight: bold; 
letter-spacing: 3px;]blah title[/div][div=width: 91%; 
margin: auto; 
margin-top: 5px; 
padding: 3px; 
height: 120px; 
font-size: 11px; 
color: #000; 
overflow: scroll;
text-align: justify;]Lorem ipsum dolor sit amet, consectetur adipiscing elit. Ut non nisl justo. Aenean rhoncus eu eros vel dapibus. Donec suscipit neque lectus, eu aliquet metus laoreet non. Quisque dignissim sem risus, et molestie augue fermentum in. Mauris sed facilisis mi. Ut quis libero vel nisi vulputate luctus sed quis elit. Integer facilisis laoreet euismod. Phasellus bibendum nibh egestas convallis sollicitudin. Integer eleifend urna sem, fermentum bibendum eros lacinia eu. Proin a nunc arcu. Praesent nec mi a sapien rhoncus aliquam at in magna. In id facilisis sem, eget faucibus nulla. Sed volutpat nisi sed scelerisque varius. Praesent in orci vel sapien scelerisque pulvinar. Nunc condimentum, elit et interdum commodo, nisi tellus condimentum lectus, ac aliquam orci quam quis odio. Aliquam eu lacinia diam, quis aliquet leo.

Maecenas ac mauris ac orci commodo vehicula. Suspendisse consequat sit amet mi in dapibus. Suspendisse cursus nisi metus, vitae varius ante euismod id. Aliquam erat neque, tristique quis sollicitudin vitae, gravida eget turpis. Quisque vitae cursus nibh, at viverra tortor. Pellentesque pretium sagittis ligula a semper. Nullam tempus pretium condimentum. Quisque varius consequat finibus.

Sed mollis lectus non odio placerat, id dignissim felis sagittis. Nullam pellentesque tellus et odio tincidunt, nec congue nulla auctor. Morbi eleifend, felis nec scelerisque vehicula, dui ex sollicitudin augue, ut sodales magna metus quis dui. Curabitur imperdiet lacus eu lectus tristique mattis varius feugiat libero. Quisque eros risus, fringilla non venenatis dignissim, mollis in est. Vestibulum eu eros tellus. Integer augue enim, sollicitudin sit amet orci at, facilisis ullamcorper lorem.[/div][div=background-color: #35516A; 
width: 30px; 
height: 30px;
text-align: center; 
border-radius: 40px; 
color: #FFF; 
font-family: Old Standard TT;
font-size: 24px;
padding: 2px;]T[/div][/div]
[ step 4 ]
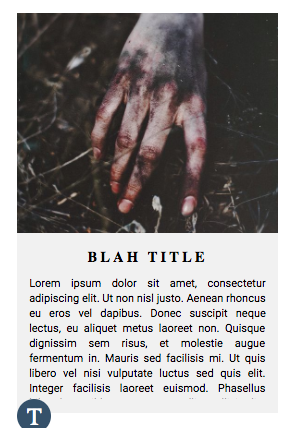
with the actual icon now created, all that's left is the positioning. somewhere in the icon's div code, add the element 'position: absolute;'. it will still be out of place but it's the first step in getting the icon where you'd like it.
9f3dc753082aba264877e80d3f2f8fe4.png
Code:
[div=width: 32%;
height: 400px;
margin: auto;
background-color: #F1F1F1;
position: relative;][div=background-image: url(https://s-media-cache-ak0.pinimg.com/564x/26/f9/2b/26f92b94796c824cf37025d39f499ba5.jpg);
font-size: 0px;
width: 100%;
height: 220px;
background-size: cover;
background-position: bottom;]b[/div][div=text-align: center; 
margin-top: 15px; 
text-transform: uppercase; 
color: #000; 
font-family: Old Standard TT; 
font-weight: bold; 
letter-spacing: 3px;]blah title[/div][div=width: 91%; 
margin: auto; 
margin-top: 5px; 
padding: 3px; 
height: 120px; 
font-size: 11px; 
color: #000; 
overflow: scroll;
text-align: justify;]Lorem ipsum dolor sit amet, consectetur adipiscing elit. Ut non nisl justo. Aenean rhoncus eu eros vel dapibus. Donec suscipit neque lectus, eu aliquet metus laoreet non. Quisque dignissim sem risus, et molestie augue fermentum in. Mauris sed facilisis mi. Ut quis libero vel nisi vulputate luctus sed quis elit. Integer facilisis laoreet euismod. Phasellus bibendum nibh egestas convallis sollicitudin. Integer eleifend urna sem, fermentum bibendum eros lacinia eu. Proin a nunc arcu. Praesent nec mi a sapien rhoncus aliquam at in magna. In id facilisis sem, eget faucibus nulla. Sed volutpat nisi sed scelerisque varius. Praesent in orci vel sapien scelerisque pulvinar. Nunc condimentum, elit et interdum commodo, nisi tellus condimentum lectus, ac aliquam orci quam quis odio. Aliquam eu lacinia diam, quis aliquet leo.

Maecenas ac mauris ac orci commodo vehicula. Suspendisse consequat sit amet mi in dapibus. Suspendisse cursus nisi metus, vitae varius ante euismod id. Aliquam erat neque, tristique quis sollicitudin vitae, gravida eget turpis. Quisque vitae cursus nibh, at viverra tortor. Pellentesque pretium sagittis ligula a semper. Nullam tempus pretium condimentum. Quisque varius consequat finibus.

Sed mollis lectus non odio placerat, id dignissim felis sagittis. Nullam pellentesque tellus et odio tincidunt, nec congue nulla auctor. Morbi eleifend, felis nec scelerisque vehicula, dui ex sollicitudin augue, ut sodales magna metus quis dui. Curabitur imperdiet lacus eu lectus tristique mattis varius feugiat libero. Quisque eros risus, fringilla non venenatis dignissim, mollis in est. Vestibulum eu eros tellus. Integer augue enim, sollicitudin sit amet orci at, facilisis ullamcorper lorem.[/div][div=background-color: #35516A; 
width: 30px; 
height: 30px;
text-align: center; 
border-radius: 40px; 
color: #FFF; 
font-family: Old Standard TT;
font-size: 24px;
padding: 2px;
position: absolute;]T[/div][/div]
[ step 5 ]
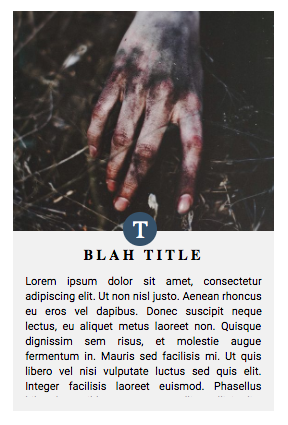
onto the positioning. using the top (i.e. top: [input value]px) and left (i.e. left: [input value]px) you can shift the icon around without worrying about moving or messing up any of the other coding. right & bottom work just the same, but i won't be using them. these elements work similarly to margin-top & margin-left, though top & left are used hand-in-hand with the position property, while margin-top/left are not. the top value is how far from the top your div is, the left value is how far from the left. in order to move the icon from its current place, increase/decrease the values of the top & left elements until you've got it where you want it.
953295f11a58f048881c0b92e25b6f91.png
Code:
[div=width: 32%;
height: 400px;
margin: auto;
background-color: #F1F1F1;
position: relative;][div=background-image: url(https://s-media-cache-ak0.pinimg.com/564x/26/f9/2b/26f92b94796c824cf37025d39f499ba5.jpg);
font-size: 0px;
width: 100%;
height: 220px;
background-size: cover;
background-position: bottom;]b[/div][div=text-align: center; 
margin-top: 15px; 
text-transform: uppercase; 
color: #000; 
font-family: Old Standard TT; 
font-weight: bold; 
letter-spacing: 3px;]blah title[/div][div=width: 91%; 
margin: auto; 
margin-top: 5px; 
padding: 3px; 
height: 120px; 
font-size: 11px; 
color: #000; 
overflow: scroll;
text-align: justify;]Lorem ipsum dolor sit amet, consectetur adipiscing elit. Ut non nisl justo. Aenean rhoncus eu eros vel dapibus. Donec suscipit neque lectus, eu aliquet metus laoreet non. Quisque dignissim sem risus, et molestie augue fermentum in. Mauris sed facilisis mi. Ut quis libero vel nisi vulputate luctus sed quis elit. Integer facilisis laoreet euismod. Phasellus bibendum nibh egestas convallis sollicitudin. Integer eleifend urna sem, fermentum bibendum eros lacinia eu. Proin a nunc arcu. Praesent nec mi a sapien rhoncus aliquam at in magna. In id facilisis sem, eget faucibus nulla. Sed volutpat nisi sed scelerisque varius. Praesent in orci vel sapien scelerisque pulvinar. Nunc condimentum, elit et interdum commodo, nisi tellus condimentum lectus, ac aliquam orci quam quis odio. Aliquam eu lacinia diam, quis aliquet leo.

Maecenas ac mauris ac orci commodo vehicula. Suspendisse consequat sit amet mi in dapibus. Suspendisse cursus nisi metus, vitae varius ante euismod id. Aliquam erat neque, tristique quis sollicitudin vitae, gravida eget turpis. Quisque vitae cursus nibh, at viverra tortor. Pellentesque pretium sagittis ligula a semper. Nullam tempus pretium condimentum. Quisque varius consequat finibus.

Sed mollis lectus non odio placerat, id dignissim felis sagittis. Nullam pellentesque tellus et odio tincidunt, nec congue nulla auctor. Morbi eleifend, felis nec scelerisque vehicula, dui ex sollicitudin augue, ut sodales magna metus quis dui. Curabitur imperdiet lacus eu lectus tristique mattis varius feugiat libero. Quisque eros risus, fringilla non venenatis dignissim, mollis in est. Vestibulum eu eros tellus. Integer augue enim, sollicitudin sit amet orci at, facilisis ullamcorper lorem.[/div][div=background-color: #35516A; 
width: 30px; 
height: 30px;
text-align: center; 
border-radius: 40px; 
color: #FFF; 
font-family: Old Standard TT;
font-size: 24px;
padding: 2px;
position: absolute;
top: 201px;
left: 110px;]T[/div][/div]
 
Wow. So I can just request help and you'll give it to me no problem?
I'm clueless to pretty coding on this site. How do you make those slide down tabs look like simple words?
How do you make your post with a pretty background?
 
Wow. So I can just request help and you'll give it to me no problem?
I'm clueless to pretty coding on this site. How do you make those slide down tabs look like simple words?
How do you make your post with a pretty background?
For the slide down tabs, are you talking about accordions??
 
Parallax Parallax
The coding you're referring to is an altered version of the Accordion Coding. For more information about altering the coding, you can refer to this thread. However, I think some of the information is out of date such as size constraints and all that jazz. This link is for the original Accordion coding.
 
as stated above, there are already tutorials about the accordions, but if you don't understand/need more step-by-step instruction, feel free to let me know and i'll make one anyway! (':
 

Users who are viewing this thread

Back
Top